Are you still pressing PrntScn and pasting into Microsoft Paint or Word to capture your screen? There’s a better way to take, edit, and share your screenshots!
Windows
Windows 11 has a built-in application called the Snipping Tool. From any screen, press 🪟 Win + Shift + S to begin capturing a screenshot. Simply drag a rectangle from the top left to the bottom right of the area you want to capture, or use the buttons along the top of your screen to switch between rectangular selection, freehand selection, window, or full-screen capture.
Once an image is captured, an editor will open where you can draw arrows, add text, highlight, crop, and more!
Moodle is an open-source project that anybody can take and customize to their liking. There are many benefits to that! On Moodle’s side, they gain a community of users coming together across different institutions and companies to shape the product. That also offers Hope College tremendous flexibility, in that we can download Moodle and customize it to our needs without relying on a company to tell us what we can and can’t do.
There are many ways for a school like Hope to set up Moodle. Do you put all semesters and courses on one big server? Do you make several servers for every year or every semester?
When setting up Moodle in 2004, it was decided to set up a brand new instance of Moodle for every semester. These semesterly servers are kept frozen in time on a specific version of Moodle and its underlying technologies. This prevents updates to Moodle or updates to the server itself from breaking old courses, as well as helps keep the size of the server down.
The downside to this approach is that CIT usually isn’t applying updates to old Moodle instances… which includes some security updates. If a new version of Moodle or new updates to the Linux server that powers it come along that patch a security vulnerability, that same update also has the potential to change or break old course content. We’ve seen this before. For example, when Moodle 2.4 launched many years ago, it changed the format that courses are saved into the database. If we had updated a pre-Moodle-2.4 server to Moodle 2.4 or newer, older courses would have been completely inaccessible. CIT has always prioritized stability and reliability over all else in the services that we provide. We found the best way to organize Moodle would be to leave old servers as-is and create new up-to-date Moodle servers three times per year.
For these reasons, our past semester Moodle servers are now kept inaccessible from the public internet and are only available while on-campus. This approach is the most secure way maintain these old Moodle instances, and keeps us in compliance with cybersecurity insurance requirements, accreditation guidelines, and general security best practices.
It is possible to download (“backup”) an entire Moodle course into one file and upload (“restore”) it into future Moodle courses on future Moodle instances. Instructions for doing so are available on CIT’s website. Please reach out to the CIT Help Desk (x7670) if you have any follow-up questions!
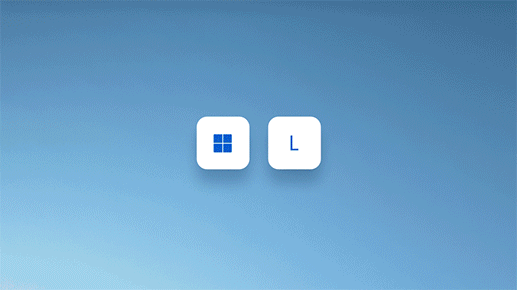
Stepping out for a moment to get cup of coffee? It’s not a great idea to just leave your work computer unlocked. Think of all of the sensitive documents, saved passwords, personal emails, and more that we entrust our computers with. It makes sense to get into the habit of locking your computer when you walk away from your desk. Luckily, it’s easy!
On our standard Windows laptops and desktops, simply press 🪟 Win + L (for “lock”!) to lock your screen. You computer stays on, but you simply need to enter in your password to resume using it.
By default in Windows 11, when you close your laptop’s lid, it locks the computer and goes to sleep. If you’d prefer to just have the computer lock but stay on, you can customize this behavior by clicking 🪟 Start → “Settings” and search for the word “Lid” in the top left corner. That will offer up the setting to “Change what closing the lid does”.
macOS
On Macs, if your keyboard has a Touch ID sensor, you can simply press it to lock the screen. You can also click the 🍎 Apple icon in the top left corner → “Lock Screen”.
By default, simply closing the lid on your Macbook will also lock the screen.
There are a few neat tools at your disposal that can automate the process of scheduling one-on-one meetings with you. This is great for advising season or other one-on-one meetings that you have often with colleagues or students!
Before we go on, all of the following is predicated on you keeping your Google Calendar up-to-date. People can’t schedule with you if they don’t know your availability! Your 1Hope Account comes with built-in free calendaring, and it’s really good. You should use it!
Option #1 — Google Calendar Appointment Scheduling
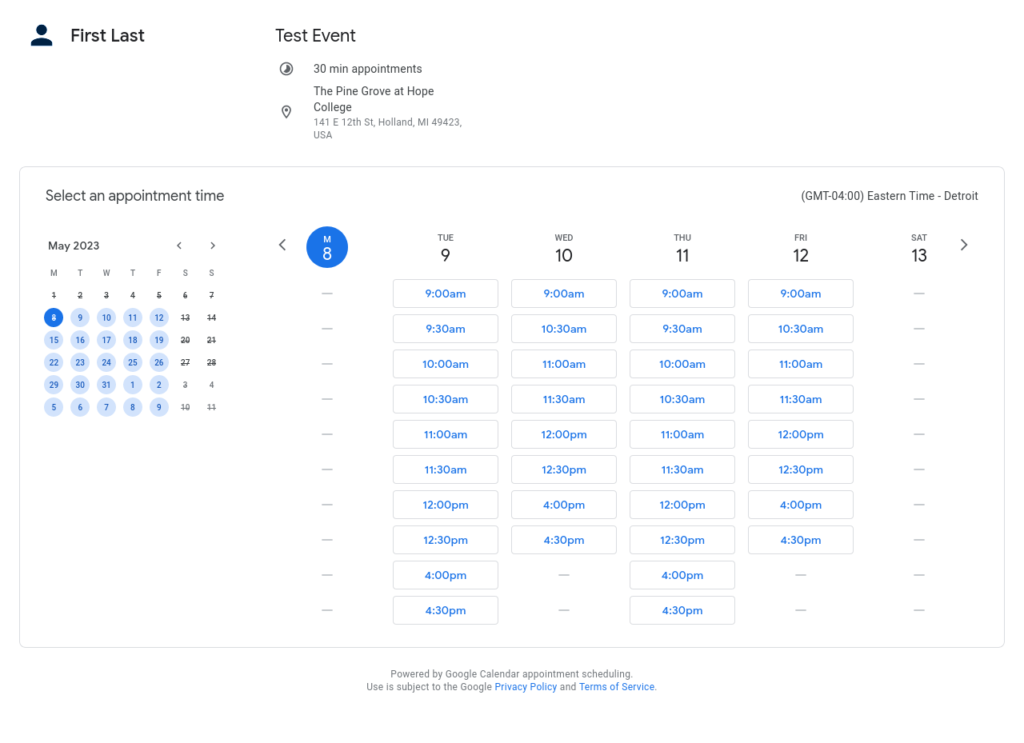
Google Calendar has a built-in appointment scheduling feature. You choose the details or your event, such as event name, location, duration, and the bounds of when someone should be able to book an appointment with you. Google Calendar then generates an interactive webpage that you can send to recipients or put on Moodle/Email Signatures/wherever. When the other party opens your link, Google Calendar automatically checks all of the times that you’re not busy on your calendar and presents the person scheduling with a screen where they can choose a day and time.
The Appointment Scheduling screen showing days and times that you are available
You can create multiple Appointment Scheduling events with different details. To get started, open your Google Calendar and click Create → Appointment schedule.
Create a new Appointment Schedule in Google Calendar, no external account needed
Option #2 — External Tools
Some of you may be familiar with Calendly, cal.com, or YouCanBook.me. These services offer a similar scheduling page option, but often have a free tier and paid tier with certain features requiring a paid subscription.
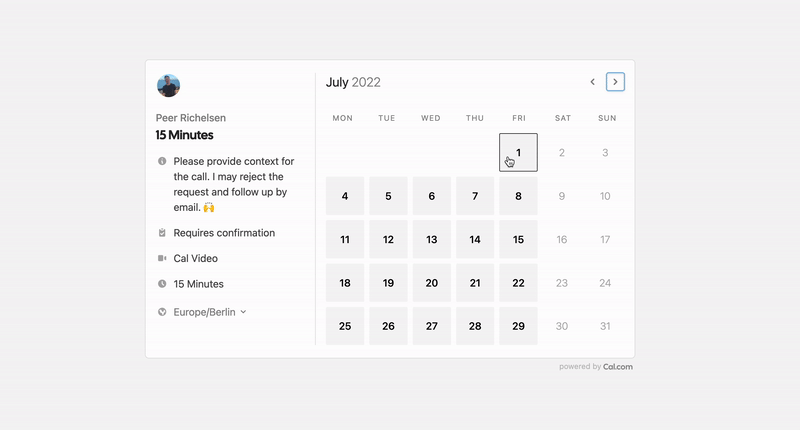
In our experience, the service that offers the most utility for free by far is cal.com. Other services charge for multiple event types, but cal.com is an open-source startup whose business model centers around charging for corporate and enterprise features. They offer their whole product for free to individual users. We highly recommend trying them out if you’re running up against the limitations of customizibility with Google Calendar Appointment Scheduling.
cal.com’s end user booking interface
These options, in addition to sharing your calendar’s free/busy with colleagues, should make Doodle polls and long scheduling email chains a thing of the past! As always, if you’re trying to accomplish something specific and would like some help, don’t hesitate to contact the CIT Help Desk (x7670). We’d be delighted to figure out a solution together!